Monday, December 9, 2013

Eyelash Growth that REALLY WORKS.

Hi loves! I am here to show you some freaking amazing news.

I FINALLY FOUND THE HOLY GRAIL PRODUCT TO MAKE MY EYELASHES GROW.

Seriously.. The proof is in the pictures and the compliments I receive on my eyelashes.

I know we are told that there is no sure way to make our eyelashes grow. I understand that. However, I have a way that keeps them conditioned and nice looking, which in turn makes your eyelashes grow. Now I can't tell you this will work for everyone, this is the only product that has ever worked on my eyelashes without going the route of Latisse. I thought about getting prescribed to latisse, but decided the side effects were too extreme for me and wanted to find a more natural route. I ended up finding a 100% all natural route.

I have tried so many different products and haven't found one that worked well until now. I've tried the rapid lash, the Tarte eyelash growth, the peter thomas roth one, the loreal one, and even tried the Vaseline trick. None of it worked very well. The thing with those products that people don't understand is that they don't have any natural oils that will help your eyelashes grow/nourish them. They state on the packaging that it helps keep your eyelashes from falling out as quickly. Your eyelashes have a 3 month cycle. A growing period, a falling out period, and a stand-still period. The falling out period, is a natural state of your eyelashes. Regrowth is pushing it's way through forcing old eyelashes out. This stage of our eyelashes sucks.. It kind of makes them look a bit thinner than usual. Our eyelashes look best during the stand still period. There is no way to change this cycle. It happens.

Now, every single night, and sometimes in the morning too, I put 100% pure argan oil on a clean, disposable mascara wand and I run it through my eyelashes just like I would a mascara. Top and bottom. I also do both sides of my top eyelashes so that way I get more product on them. I like the Josie Maran Argan Oil. She also has a light version of it too. I just get the BTG size from Sephora. It's $14 and should last a LONG time. I have been using a sample of the oil for a month and decided I had to buy it.


Here's the pictures to prove it. This is my eyelashes before I started using it. You can tell I have a lot of bald spots from my very annoying habit of pulling my eyelashes out when I am stressed out...

And these bad boys are my eyelashes now. WITH NO MASCARA on them. Isn't that awesome?! They are so much fuller and nicer and I have not been happier. I spent almost three months trying to get these bad boys to grow back from pulling them out, and had no luck except for the teeny short sparse eyelashes that you can see growing in the picture above. I used the argan oil for 1 month and my eyelashes are greater than they have ever been.


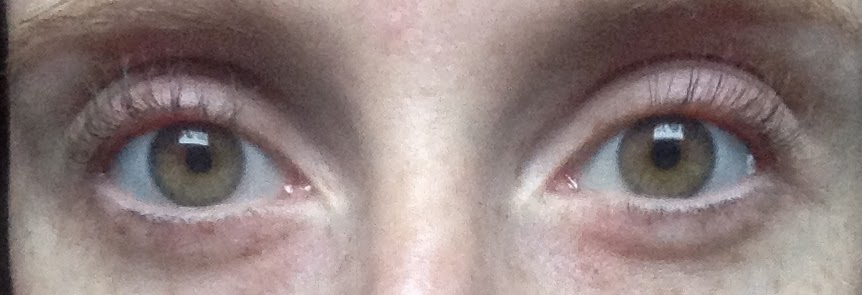
I'm hoping you can also tell the difference. In one month, my bald spots have finally started to grow in! there;s still a little bit of thinness to them, but it's better than in the very first eyelash picture.
I have never been more excited and I don't think I will ever use anything else on my eyelashes. My sister, and customers at my job are always asking what mascara I am using. I tell them it's the argan oil and they want to try it too! I'm hoping my sister has just as much luck with it as I did. If you have tried this method, let me know what you think? I really do hope you test it out. The proof is in the pictures. It's wonderful.

XO-Stacey

Wednesday, December 4, 2013

Heatless Hair Hunt... Failure

Hi loves! I am again on the hunt for some heatless hairstyles. Mostly curls. I love curling my hair. I watched a great tutorial the other night and did what it said. I failed... But I am determined to make it work! I watched this tutorial and figured I could easily do the same.

Here is where I went wrong..
1. I have much thicker hair then this lovely lady... so I needed more curlers.
2. I'm pretty sure I curled too tight
3. I'm also sure I curled too close to the root.

If you didn't check out StilaBabe09's hair tutorial, it's a heatless hair style using the conair spiral rollers. I got mine from target for... $14 however you can get there online here for $10.

Here is what the rollers look like.


I did as the tutorial said... I washed my hair, put my favorite hair products in and began to wrap.
I think it might be a little bit more helpful for me if I dry my hair halfway/let it air dry halfway before wrapping my hair. That's the new step that I will try out tonight.

If you watched the tutorial followed, then you'll see that mine are much more tightly wrapped as well.


Lastly... here is the unfortunate event that we call my hairstyle for work today.

Thankfully, I just threw it in a bun on top of my head and hoped for the best in that scenario. Clearly, my face in these pictures show that this is NOT how I hoped my hair would turn out. I'm pretty sure I look like I came straight out of the 80's with the horrific perms they used to do. I'm pretty sure if I put a pictures of my mom from the 80's and this picture above right next to each other you would think we had our hair done in the same era.

Womp Womp. If any of you heatless hair lovers can tell me a different way to wrap my hair to make these work... I WOULD LOVE YOU FOREVER. Seriously. I want these to work so bad. I never straighten my hair because it is just way too damaging. But I ALWAYS curl it or it's in some wild bun on the top of my head. Which isn't exactly the most professional look for my job. So I need to cut that out.

HELP!

XO-Stacey

Friday, November 29, 2013

Clarisonic Mia 2 Review

Hello loves, I know what you're thinking, another review and so soon?! YES! It is! I've been working on this one for awhile, even though I know that there are tons a videos and blog posts about the Clarisonic Mia 2. I still wanted to tell you what I think about it.

Let us back track a bit. So I got the Mia 2 as a gift.. sort of... from my boyfriend. Actually, I was thinking about buying one, but they are so gosh darn expensive. I found one on Ebay up for bid starting at like $40 and gave myself a limit for $75. I know what you're thinking... Ew off of Ebay was it used?! And no it wasn't. It was still in it's originally packaging never opened, never charged, nothing. (Even if you can find a cheap used one that works... GET IT. Just go out and get yourself a new brush head. Good as new) Anyways.. I started bidding... and ended up getting it for $70. Which is a great deal considering that it is more than 50% off. Once I told my boyfriend about it he said... well then... that can be my anniversary present to you. (we decided on no presents this year) Thanks babe...?

Anyways, I received it like 3 days later. Let me tell you how awesome my skin is now. I have a lot of redness on my chin from acne scarring, and acne in general. It seems that because I am so fair skinned, if I get a pimple the redness stays on my skin for what seems like forever. Now, I feel 100% confident going out without any makeup on my face. I don't wear a ton of face makeup as it is, but it is seriously amazing. With anything skin care, you are supposed to give it approximately 2 weeks to a month, to be able to see any benefits. The first time I used my Mia 2, my skin felt so much cleaner. It was such an odd feeling for the first couple days. My skin broke out a little bit from it not being used to the brush, but cleared up fairly quickly. I notice that I'm having less breakouts than usual. I only get hormonal break outs on my chin, but it used to be when I did, they were big and angry and red and there would be 3-5 zits that would pop up randomly one day (oh the joys of PMS). Now I'm down to like 1 - 2 a month so that's pretty awesome! The redness in my skin is dulling down a bit too which I'm loving.

More about the product: If you have ever looked into a Clarisonic, then you know they always show a picture of skin that has been cleaned with hands, and skin that has been cleaned with a clarisonic. To me, the picture was never convincing. Not until I actually purchased one, did I believe it. A really good way to look at it though, is in terms of money. When cleaning your face with your hands, and then putting your serums, eye creams, and moisturizers on afterwards, you are only getting about 40% of the benefits of those products. So it dollar form... if you purchase an eye cream that is $100.. you are only receiving about $40 of that product. With the Clarisonic in conjunction with your other face products, you will get the full benefit. I honestly think that this is very true.

When I'm working on clients, a lot of them say that they own a Clarisonic. I have never had a client tell me that they didn't like it. Every person I have talked to has given me the same exact speech. "I haven't used mine in awhile, but I need to because I can already tell my skin isn't looking how it generally does when I use it" or something along those lines. And I can 100% agree with this statement. If I skip a day using my Clarisonic.. which happens from time-to-time (I'm lazy..), I will immediately break out. And the moment I use it again, it will clear up within a couple days. That's crazy right?!

I have the white Mia 2. But there are tons of colors. You can purchase them at dermatologists, Sephora, Ulta, and I'm sure a few others. The Mia is $125. The Mia 2is $150 and The Aria is $200. My district manager says that if someone is just starting out in the world of clarisonic to get a Mia. It has one speed. Then as time goes on, you can upgrade. Honestly, I would have been okay with just the Mia, but you can get some really cool bonus packs at Sephora with the Mia 2. I think right now for Giftopia they are doing a Mia 2 that comes with a bunch of other face products(cleansers, masks, moisturizers) for $150. Or you could just go to Ebay, and take a look.

If you have a Clarisonic -- comment below to tell others what you think about it? If you don't have one, do you think it is all a gimmick?

XO-Stacey

Wednesday, November 20, 2013

Buxom Eyeliner Review

Beauties! It has been quite awhile since I have posted and I am extremely sorry for my absence. I've been in this crazy process of moving and trying to get my new house set up and it's been a stressful mess. Long story short, we were supposed to get new carpet and hardwood installed the day before we moved, but we didn't get it until the same day that we moved in, and of course it rained all day long while we moved. Then the wood for our kitchen/dining room and entry way didn't come in on time (and we are still waiting for it) so the house looks a bit a mess. We also haven't had a day off together in forever so we still have to paint basically every single room. We only have one room in the house completely finished but I've been taking lots of pictures so that way I can post some painting ideas and the before and afters of the rooms, and DIY's for the rooms. It's coming along slowly. Unfortunately, we are kind of at a stand still until we get the hard wood put in, and make it past the Holiday's before any major renovations being taking place.

On to what I actually want to talk about. It seems that the posts I am getting the most feedback from are the ones where I review products. Because of my job, I get and purchase a lot of new products/products I haven't heard much about so I can try them before trying them out on customers.

I've been testing out the Buxom Hold the Line Waterproof Eyeliner(s)for about a month or two, and let me tell you, I have found my new favorite black eyeliner. It is a pencil eyeliner that comes in 8 different shades. I only own the one in Jet Black, however, I have tried about 5 of the other colors and it seems to me that they all perform the same.

The eyeliner is $17 at Sephora and it comes with a pencil sharpener which is always nice. It is paraban free, sulfate free, and phthalate free. It comes in matte, metallic, and sparkling shades. (I have only used the matte and metallic shades) The texture of this eyeliner is so creamy and the pigmentation is awesome. I have no trouble with it staying on my eyes all day long. The product claims "14-hour wear" but I think the wear of a product really depends on the person. It stays in my waterline all day long. I generally only put eyeliner on my upper water line, and I do occasionally see some product transfer onto my lower waterline. This isn't a huge deal to me because that's a hard thing for an eyeliner to accomplish, but it could be a deal breaker for you?

I think that this product is definitely worth a try. Reading the reviews on sephora.com -- it got a 4 out of 5 star rating which is pretty darn good for an eyeliner in my opinion. It looks like many of the people are saying the sparkling eyeliners are giving them troubles, I am also seeing a lot of people complaining about the staying power of any of the eyeliners. I use a primer and have no problems with it smudging. It could be that people aren't using a primer with it, or that these people have oily eyelids. I don't have oily eyelids, so I cannot attest to this issue. If you have oily eyelids and have tried this product let us know in the comments if it worked for you or not?

Here is the eyeliner, and a swatch of the eyeliner... Great pigmentation right?


Here is the eyeliner on my top eyelid and all the way around my waterline.


I love you all much! I hope you liked this review. If you have any requests or specific products you want me to review, just comment or email me or DM me on twitter and I'll do it for you!

XO-Stacey


Tuesday, October 1, 2013

Formula X for Sephora Review

Hello Loves!

I know it's been awhile, but I have an awesome review for you today about some nail polishes you don't want to miss out on. Sephora will have a new nail polish display, and new nail polishes, coming to stores October 3rd. You can get them online here before they hit stores.

What I am going to be talking about here, is something from the nail treatment, nail polish, and nail effects section.

I believe there is going to be a set called "The System" that is $32. The nail polishes individually are $10.50, the nail effects are $12.50, and nail treatments are $10.50 to $14.
Sorry for the random other products. The nail polishes are in the back!

The first thing we are going to talk about is "The System". In the system you receive 4 steps to an expert manicure. Step 1. is to cleanse. This is in the nail treatment section. It claims to prep the nail base by eliminating residue. I'm not sure if this does anything, but I could tell a difference in how my nail felt after putting this step on. It seems like an extra step, but I think it really does help the nail polish adhere better to the nail. Step 2. is to prime. The base coat is a bit stickier than most to ensure the nail lacquer will adhere. Step 3. Is the actual nail polish. Apply one to two coats of it. I got a dark red, and found that one coat was extremely opaque, but chose to do two to ensure that the color was even. The final step is shine. This top coat is pretty glossy, and dries rather quickly.

Overall, I enjoy "The System" the polish has withstood a day of serving, a long few days in a stock room for an RTW and a day of playing with my eventual step-daughter. Clearly it's gone through some rough playtime. It is going on 6 days without chipping, so it's safe to say I'm pretty dag-on impressed.

*All polishes by formula X are paraben free.

The coolest par about this line though is the nail effects. I only have one effect, but I will 100% be purchasing more because of how absolutely awesome this one is. I have one of the Xplosives in "Chaotic". I showed my nails to my boyfriend after I put this on. He told me that if he hadn't had known that this was one coat of polish, that he would have told me I had way too much time on my hands to put that much detail into my nails.
The Xplosives basically look like splattered paint. It seriously looks so neat. I cannot wait to purchase more and check out the other nail effects. I believe Avon, has a similar polish line but I am unsure on the prices and quality of that particular brand.

I would say that if you purchase anything from this line, you have to check out the nail effects and I would also check out the cleanse polish.

If you have used these polishes, let me know what you think about them in the comments below!

XO-Stacey

Wednesday, September 18, 2013

What age should you start using eye creams?

Hey beauties!

I have been running into this question for quite sometime. Since I have started my new job where I do a lot of skin type consultations and such, I keep wondering when the right time is to start using eye cream?

If you didn't know, I am 21 years old. Is your 20's the right time to start? Should you do it earlier or later? What I have come to the conclusion of, when looking at articles, and in my job, is that it depends on your skin type.

If you have dry skin, you want to start earlier. Dry skin wrinkles much easier and faster than those with oily skin. I have EXTREMELY dry skin, so I have a few eye cream samples that I've been dabbling in.

Why do we use eye creams you may ask? -- The skin around the eye is extremely thin compared to the rest of your face. This area is prone to wrinkles quicker than the rest of your face. Crows feet and dark under eye circles are problems that occur in many people at various ages. Eye creams generally combat under-eye circles, puffiness, and fill in line.  I think the thing that people don't fully understand, is that they are using them too late in life.

Using an eye cream is a great preventative method however, I realize that it is extremely annoying to have an extra step in your routine. I would say, start when you're in your twenties! It is good for your skin!! I have only been using an eye cream for about a week, but I can already tell that my concealer looks much smoother.

Let me know if you use one or not! Is it all just hype or is it really worth it?

XO-Stacey

Tuesday, September 10, 2013

Hair Fail.

Beauties,

It's been awhile since I have blogged. I got a new job along with my serving job so I am super busy but I'm pretty much loving life and having a fun time. But I come with you today with a hair fail...

Now, I wanted my hair to be back to its natural hair color. 1. This will never happen for a red head. It's practically impossible to get back to your exact shade. 2. This went horribly wrong.

I did it myself because I've done it before, and loved it. This time went awfully wrong. I think that a. I picked the wrong color by one shade. (I picked Light red blonde) b. I left it on too long. and c. my developer was possibly too high.

Now I want you to know, I've done this before and it worked out fine. Too bad I couldn't remember the color I used last time... because this time failed. I used 20 developer last time, and that's what I got this time. I left it on for 30 minutes which was 15 minutes less than the time stated.

So here are my pictures.. in case you like this color, then you'll know what you need. It's not a bad color, but I don't think it suits me. I've seen other people with this hair color and it looks awesome... but I look silly.

Everything was from sally's.


The color mixed

Looking Worried

Looking upset and bright

The final hair.


So this is the final fail... the top part in the last picture looks lighter than the bottom but it's not. I think it was just the lighting outside. I don't hate I guess, but I'm not in love with it either. I've had my hair this color before like 5 years ago and loved it when I was in my angsty teenage phase.. But I'm not in the phase anymore and I'm a grown up, so this is weird...

Do you like it? Can you pull this color off? Tell me how you pull it off while I wait for it to fade.

XO-Stacey

Monday, September 2, 2013

DIY Dollar Store Fall Wreath

Today I have a bit of a different post. I was really interested in making a fall wreath and kind of changing up the decor in my living room a bit to make it more fall appropriate since it's already September.

I'm not exactly ready for fall to be here, but it is so I needed to have a Crafty Monday. Now, I made two of these, a really small one which I'll just show you a picture of my mantle and a large one to hang on my door. Unfortunately, the house I am currently living in, I can't put the wreath up on the door because the actual door and the glass door in front of it are too close together... So i just put it in my living room.

Let me start off by saying I spent a total of $11 on the large wreath and $4 on the small one. HOWEVER... the large one can be less expensive and I'll talk about that in just a second.


So here is what you'll need:

18-inche wreath -- I had to get this at JoAnn's because my Dollar Store was all out. (Mine was $5 for the wreath, so if you can find yours at the Dollar Store then you'll be saving more money!)
Leaves -- I purchased 5 packs of leaves to ensure it was very full, however I did see that for $2 at Joann's you could purchase a pack of 30 when mine only came in a pack of 10. (if you didn't catch that, that means more savings) 
Flowers -- This step is optional. I added some fake flowers to add a little extra something to my wreath, but it looked just as good without out them.
Hot Glue Gun -- If you don't have one of these, you can get a really cheap one from Joann's for around $3.

1.  I separated my leaves out, and placed them in a very plain pattern all the way around wreath. A great thing about these leaves though, is that they have wire in them so I attached them by the wire instead of hot-gluing.


2.  Next I started to fill in the inner rim on the wreath so that I could hide most of the wood part. (It's okay if you don't want to do this, it's just personal preference.

3. Then, I added fullness around the outside rim. I filled in any holes that looked a bit sparse. My leaves were looking a bit straight and flat, so I scrunched them up to make them look more leaf-like.

4. Lastly, I cut the flowers off the stems and hot glued them in any sparse areas. This step is optional, but I really like how it looks. I also, sprinkled it with some gold glitter because nothing says fall like gold glitter! This is my Final Result.


This is my fire place after I made the smaller wreath on the far left behind the orange candle. On that one I bought 3 or so fake flower clusters, cut them off, and hot glued them in a circle around the small wreath. I think this was a 9-inch wreath. I really like how this one turned out too.


I hope you liked my Decor DIY. I'm thinking I might do some more of these, especially when my boyfriend and I move into our new house in about a month. We are going to do a bunch of renovating before we move in, so I'd love to show my DIY renovations too.

If you make a wreath like that, send me a picture! Any questions? Comment below. I'm sure I can help!

XO-Stacey

Thursday, August 29, 2013

Another Hair Failure...

Beauty Lovers!!

I watched another heatless wave tutorial... and decided to try it out. I'll tell you how I did it in steps... however, it didn't work out the best for me which makes me so sad. My hair texture has changed again. It's slightly annoying. I've never head relatively straight hair since I was in kindergarten or so. But now my hair is straight... what do I do?

The first thing you need to do is wash your hair.

Then add a heat protectant into your hair. Hush your brain before you say it. "Stacey, a heat protectant? I thought this was supposed to be heatless."


Next I blow dried my hair with cool air with random shots of warm air to make it go a bit faster.

Then I split my hair into two different pony tails, and twisted my hair into two buns. Bobby pin the buns and spray some hairspray on them.


 Lastly go to sleep!


When you wake up you're supposed to have lovely, beach-like waves. Mine on the other hand, turned out like this...
'

It could have been fine... but my hair is so thick and course that I feel like it got all weird on me. I don't think it looks awful, but it definitely doesn't look nice either.

Try it out and see if it works out for you? Or tell me how I can make it work for me? Please?

Xo-Stacey

Saturday, August 24, 2013

Tweezerman Eyelash Curler

For all my makeup life, I've always heard and been told that your eyelash curler doesn't matter, as long as you have one, you're good. I have always purchased the cheap Revlon ones and never thought anything of it. I just thought it was my eyelashes or my mascara that was making it so my eyelashes wouldn't stay curled. Boy was I wrong. The only other YouTube beauty guru that I have watched that has said your eyelash curler makes a difference was amarixe and I didn't believe her...until now.

I have straight as a board eyelashes. So straight in fact, that throughout high school I would blow dry my eyelash curler and then curl my eyelashes to hopefully make them stay. Some days they turned out crazy spidery looking, other days they looked fine. I was at work the other day, and I asked my coworker who has beautifully curled eyelashes what she used. She said she used a Revlon one... I was perplexed... how in the world were her eyelashes looking so perfect and mine fell straight?

I had a couple Target gift cards lying around, and went searching to see if I could find a different eyelash curler that would curl these bad boys. I mosied around for quite sometime and then I stumbled across these $12 Tweezerman eyelash curlers. There were also a couple other only $9. A girl I was with told me to just get it. I was a bit worried, $12 for an eyelash curler? The Revlon ones were like $2... what could possibly be the difference?

The next day, I used this new eyelash curler, and holy curly eyelashes... This eyelash curler is a dream boat. If you have stick straight eyelashes I will 100% vouch for this eyelash curler. It is so unbelievably great.

On the left is my old, Revlon eyelash curler and on the right is the Tweezerman eyelash curler. 


Here is my proof to you. First is a picture of my naked eyelashes. The left side was curled with the Revlon eyelash curler while the right side was curled with the Tweezerman eyelash curler.


Now here are my eyelashes with one coat of mascara on them.


Lastly, here are my eyelashes with two coats of mascara on them.They both look alright here. but the kicker is the next one.


Lastly, Here are my eyelashes exactly one hour later. The Tweezerman side is still pretty perfectly curled, while the Revlon side is rather straight... and the more time that passes, the straighter these eyelashes got. Thank goodness I found the Tweezerman eyelash curler!


If you have crazy, super straight eyelashes, let me know what your favorite eyelash curler is? Have any of you eyelash obsessives noticed a difference in how your eyelashes look when curled by different eyelash curlers? Is there a less expensive alternative? Tell me your thoughts!

XO - Stacey

Monday, August 19, 2013

Miley Cyrus/Punk Inspired Look

Hello Beauty Lovers!


If any of you love Miley Cyrus and her complete off-the-wall new attitude like I do. You might love this video that I have for you today. I realize Miley Cyrus is a pretty controversial subject since one day she was Hannah Montana and now shes party central, but hey, I love the new crazy Miley. Bring it on! I tried out the look shes been doing recently with dark eyes and red lips, but you could also swap it out for a super nude lip for she does that as well. I also tried out her hair. I gave myself a mohawk. No worries, I didn't shave off all my hair, just used my hair to my advantage. 

I hope you enjoy this wildly punk look! Comment below and tell me if you try out the makeup or the hair, or what you would do to make it more wearable for you?

XO - Stacey


Wednesday, August 7, 2013

Natural Everyday Eye Using Pink

Hi loves!

Recently I've been playing around with my collection a bit more than usual when I get ready for work and such. I've been going really natural on my eyes while I'm at work, and then when I want to kick it up a notch I just had some heavy winged liner to make it more night appropriate. But I wanted to show you what I've been loving. Here's what you're going to do...

Step one: Prime your eyes!


Step Two: Use a white shade all over your lid. I chose to use Virgin from the Naked 1


Step 3: Use a BRIGHT pink on a tapered crease brush and run it mostly through the outer half of your crease.


Step Four: Run a matte brown shadow through your crease and use it to blend the pink color out. This will tone the color down. I used Naked from the Naked 1.

Step 5: Curl your lashes and add mascara! DONE!

How easy was that?? I've been wearing this super natural eye look for awhile. I'm sure you were a bit worried when that bright pink shadow was going on. Look at how toned down it became though!

Here, I just added some thick eyeliner to take it from work to a night out...

Isn't makeup fun? I hope you enjoyed this. I really enjoyed making this blog post. If you try this look out, post a comment and maybe even a picture!

XO-Stacey